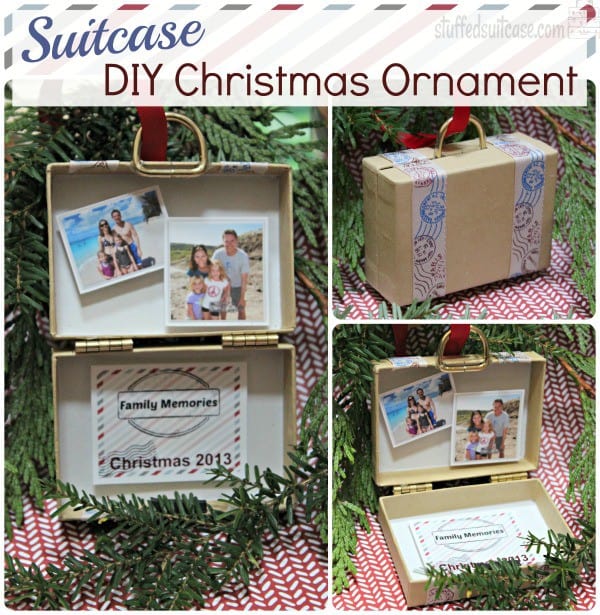
DIY Christmas Ornament: Stuffed Suitcase Travel Memories
Today is my very first crafty post for my family travel & family life blog! I am taking part in the No Ugly Ornament 2013 series organized by My Very Educated Mother. And what should a travel blogger make for a DIY Christmas ornament?. Why, a suitcase of course!
I purchased two jewelry gift boxes from Michaels with the idea of using just the lids to create the suitcase DIY Christmas ornament. Michaels also had some very cute travel ribbon that was perfect to complement the suitcases. A trip to Home Depot secured my hinges and a handle (D link). I think I spent around $7 for the materials.
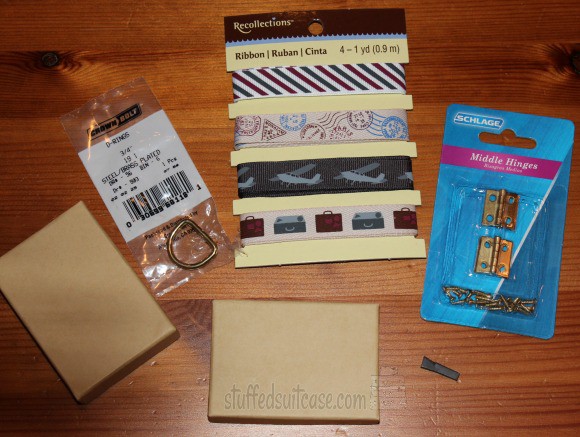
First I lined up the D link ring and marked where I wanted to snip into the box so that the D link would lay flush with the edge of the box. I wanted it to be inset so the suitcase would close. I used wire snippers to snip away at the box and create the notches. Then some tacky glue was used to set the D link into the notches.

Next I had to add a magnet (I snipped this piece off an old fridge magnet) to line up with the D link on the opposite lid. This is what holds the suitcase closed, so make sure the strip of magnet is strong enough to grab the D link. After that I added the hinges in from equidistant (.25″) to the box edge. Again, I used tacky glue.

Lastly were the finishing touches on my suitcase DIY Christmas ornament. Adding some travel theme ribbon around the suitcase. Then printing off 2 travel photos from recent trips to insert. The photos were about 1.25″ x 1″ and I mounted them on top of some craft foam pieces to make them pop out from the suitcase. At the last minute I added a Merry Christmas 2013, but it is poorly done. I’d like to add a ribbon to hand an touch up the Merry Christmas message. Check back soon for updated final photos. I added a custom “Family Memories Christmas 2013” tag created on PicMonkey to the bottom half of the suitcase. I’m happy to share the “Family Memories” graphic, in case you want to use it yourself.

I hope you like this DIY Christmas Ornament! It’s a great way to remember a trip or trips you took that calendar year, or even for a gift for a loved one who lives far away. If you have any questions about a step, please feel free to ask. And, if you’d like some more DIY Christmas Ornament ideas, check out the No Ugly Ornament 2013 series.


What a clever idea! Thank you for being a part of the No Ugly Ornament Series!
Thanks for organizing the series Erin! It was a great introduction into the DIY crafting photography world for me. :)
This would be awesome year round! I can’t wait to make a few!
Thanks for stopping by Kristina! Hope you have fun crafting!
This is so cute! I love handmade Christmas ornaments!
Thanks Abby!
That’s adorable!
Thank you Steph!
That is amazing, I totally assumed you had bought a tiny, functioning suitcase ornament somewhere and I was like, “where the heck did she get that?!” Love it!
Thanks so much Justine! The concept had to evolve from idea to implementation. Pretty sure I spent a few hours in Michaels and Home Depot wandering around for inspiration!
I love this idea! We buy a special ornament for each of our girls every year. I love the idea of having an ornament with pictures from a special vacation. So neat! Thanks so much for linking up at #RealFamilyFun. I’m featuring this post on my social media sites on Sunday.
Take care,
KC
Thank you KC! I love linking up at your Wednesday party!
This is so neat! I’m definitely going to have to make this with our trip to Taiwan photos!
Thanks for visiting Dani! Hope you have/had a good trip!
Cute!!! These would make great gifts for other families/friends that travel. Just add a photo for them or leave a space for them to add one they like instead. Love this!
Absolutely Chamisa! I think it would make a great gift.
This is just adorable! Great idea :)
Thanks so much Jacquie!
that is so cute, and I love this idea to commemorate vacations.
Thank you! Happy travels!
Cutest Christmas ornament ever! I love it and will certainly have to make one for myself! Thanks for sharing this adorable project at The Pin Junkie party. It was featured this week. Please stop by to grab a button and be sure to link up your best fall crafts at this week’s party! http://www.thepinjunkie.com/2013/11/friday-link-party-43.html
How exciting! Thank you so much Bonnie for featuring me. I’m heading over to get my button!
That is SO FREAKING CUTE! We must make these!!!
Thanks Denise! Share your link with me if you post about it! :) Thanks for visiting!
Thanks for this! Made these for my Girl Scout troop, tied into a trip we took over the summer. They turned out so cute! Kids can either use them as an ornament, or a picture frame. For me, the hinges were too fragile with just glue, so I put enough glue on to hold them in place, then used my Dremel to drill holes so that I could sew the hinges on. Works like a charm, and gives them a lot more durability. Another trick, I photoshopped the photos I used into something that would print in a 4×6 print. I did each one 3 different sizes so I would have options on how they fit in. I also did one to commemorate our family trip this year. Got pictures from Yellowstone, Grand Teton, Mount Rushmore and Rocky Mountain National Park. Added some mini national park stickers to the outside of the case, looks so cool!!!